Finishes for the vac bed;
Close the bag:
To seal things up I went super simple.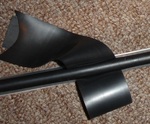 Simple close
Used:
- Rubber cord
- Plastic track (found in wiring section of the hardware store)
This works by simply pressing the envelope into the channel of the track with the rubber cord.
I have in mind a side opening bag with a magnetic seal but this is far to complex for a first attempt at a vac bed.
One way valve:
 All valve parts The purpose of the one way valve is so that one can turn off the vacuum pump (this case a shop-vac) and have the vacuum inside the bed remain. A crude valve is a flap of rubber that sits on top of an airway allowing air to pass in only one direction. This works because in the flow direction air can easily pass beneath the flap. In the stop direction air will push the flap closed blocking the airway.
This ended up having two solutions. First was a double flap valve that I made myself. Second and far more effective was to use the exhaust valve from the mask (see below for mask)
Plan A: Plan A valve
- cut two circular pieces of acrylic to fit inside a pipe coupling.
- drill a centre hole to mount the flap
- drill a number of larger holes for air flow.
- Cut a circular piece of rubber and put a hole in the centre
- Mount the rubber flap on the acrylic (I used a Chicago screw)
- Be sure the screw is tight enough to hold the flap in place but not squeezing the rubber. If squeezed the rubber will pull away from the acrylic and not seal.
- Use a drop of thread locker or super glue to prevent the screw from coming apart
- Mount your new valve inside a pipe coupling and seal it (bit of silicone calk woks great here)
Problems encountered with Plan A:
- Thick rubber does not close to seal. (fixed by switching to thin latex)
- Acrylic does not dry seal well (fixed by using some calk)
- Screw head and flap lost to vacume (fixed by letting thread locker cure or use superglue) (yes I did think ahead on this one just was not patient enough)
- Flap pulls away from acrylic (fixed by making sure lose fit; do not stretch rubber flap)
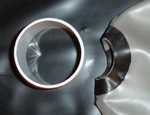
Plan B: Plan B valve
- Use exhaust assembly from the mask
- This happened to fit perfectly in the end of the 2’’ pvc pipe
- Stick this in the end of your tee and add a small bit of pipe to hold it there and done.
- Can mod this by adding rubber O ring to improve seal or make a unit with a coupling and some pipe bits calk and glue for good seal.
Breathing rig.
See post: http://arcnet01.com/the-lab/2010/8/4/vac-bed-breathing-rig.html